
How to Make Chilli Flakes
Knowing how to make chilli flakes or powder with your homegrown chillies is very simple and perhaps the easiest way to use up a glut of ripe chillies. Making flakes is the perfect activity for an autumn when you plants are heaving with ripe fruit.
The easiest method that produces the most consistent results is to use a food dehydrator. This is the method I usually use as it is easiest and produces consistently good results. That said it is just as easy to use a regular regular domestic oven. In this guide/recipe I will tell you how to use both methods.
Once you’ve tasted homemade flakes you’ll wonder why you ever bought the jars from the supermarket. The difference in freshness and flavour is immediately noticeable, and making your own means you have complete control over the heat level and variety.
The process is simple: dry the chillies until completely brittle, then grind to your preferred texture. You can use a regular domestic oven or a food dehydrator — both produce excellent results, with the dehydrator giving more consistent temperatures and the oven requiring less specialist equipment.
We’ve been making our own chilli flakes for years, typically setting aside an afternoon in late summer or early autumn when the plants are at peak production. A morning’s harvest can fill several jars that last through the winter.
How to Make the Flakes
1. Wash and towel dry your chilli pods
2. De-stalk and slice the pods in half, placing face up on a baking tray (leave the seeds in)
3. Place in an oven heated to 80 degrees celcius (approx 175 fahrenheit) and leave the door slightly ajar
4. Check the pods every hour. You can remove them from the oven when the pods are brittle and crumble between your fingers. Depending on the variety this can take anything from 2-5 hours.
By leaving the oven door slightly ajar the moisture can escape the oven, which in turn helps with the drying process. It also helps to ensure a lower temperature, reducing the chances of you cooking the pods. The aim is to dry the chilli pods not to cook them.
The chillies will give off quite an intense aroma during this drying phase so it might be an idea to shut the kitchen door and open a couple of windows.
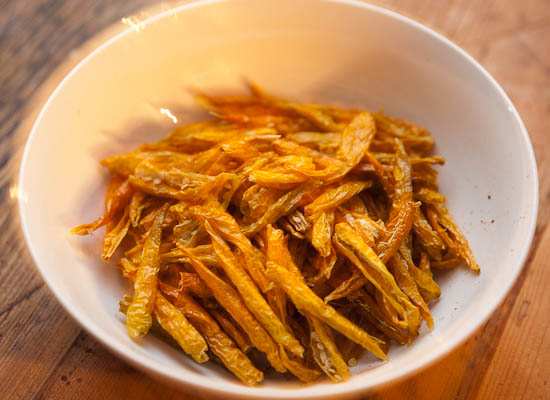
Different varieties of pods will take different amounts of time. When you can easily crumble the pods between your fingers you know they’re done.
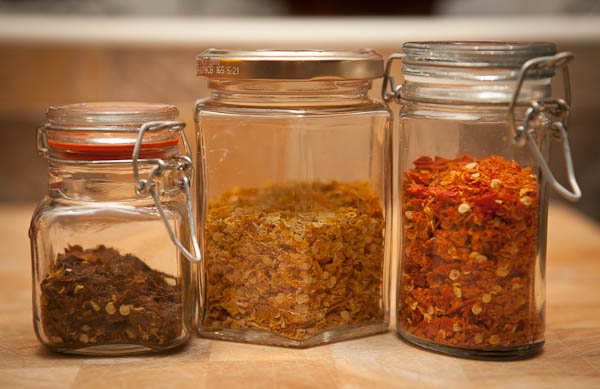
Once the chillies have dried remove the pods from the oven before grinding them to the size you desire. Personally I like the resulting mixture to be about half powder and half small flakes.
For this batch I simply placed the dry chillies in a bowl and ground them down between my fingers. You could easily use a spice grinder or pestle and mortar instead.
If using your hand be sure to wear food grade nitrite gloves….oh and don’t remove you contact lenses just after making your powder!
Grinding and Storing Your Chilli Flakes
Once your chillies are completely dry and cooled, grinding is the satisfying final step. The method depends on what equipment you have available and how fine you want the end result.
By hand — place cooled dried chillies in a ziplock bag and crush with a rolling pin (Shane in our comments uses this method). Quick, simple, no equipment needed and gives good control over texture. Always wear gloves before opening the bag.
Pestle and mortar — gives excellent control over texture and allows you to feel exactly when you’ve reached your preferred coarseness. Works beautifully for small batches.
Spice grinder or coffee grinder — the fastest method for larger batches. Pulse rather than running continuously for better texture control. Clean thoroughly after use — capsaicin residue in a coffee grinder makes for memorable morning coffee.
Food processor — works for large batches but tends to produce an uneven result with some powder and some large pieces. Fine for cooking use but less elegant as a finishing spice.
Once ground, store in airtight glass jars away from direct light. Homemade chilli flakes keep their colour and flavour for 6-12 months when stored correctly. Small Kilner jars from Amazon are ideal for longer-term storage and also make attractive gifts for family and friends.
Using a Food Dehydrator
A food dehydrator is the more reliable method for making chilli flakes, particularly for thick-walled varieties or large batches. The controlled temperature and consistent airflow produce more even drying than an oven and the risk of accidentally cooking rather than drying the chillies is much lower.
Temperature: Set to 55-60°C. Higher temperatures will cook the chillies rather than drying them, which reduces colour vibrancy and can make the finished flakes taste slightly bitter.
Time: 4-8 hours depending on variety. Thin-walled varieties like cayenne are usually done in 4-5 hours. Thick-walled varieties like habanero may need 7-8 hours.
Arrangement: Arrange chilli halves in a single layer on the dehydrator trays with the cut side facing up. Don’t stack or overlap — airflow is what dries them evenly.
Testing: The chillies are ready when they snap cleanly rather than bending, and crumble immediately when crushed between gloved fingers. Any flexibility means they need more time — even a little residual moisture will cause mould in storage.
If you’re serious about making chilli flakes regularly, a food dehydrator is worth investing in. A good mid-range model available on Amazon handles chillies, herbs, fruit and mushrooms equally well and pays for itself quickly in preserved harvests.
Which Chillies Make the Best Flakes?
Almost any chilli variety can be dried and made into flakes, and the choice of variety makes a dramatic difference to the flavour and heat of the finished product. This is the real advantage of making your own — supermarket chilli flakes are almost always made from generic varieties with no particular flavour character, while homemade flakes can reflect the distinctive taste of whatever you’re growing.
For classic red chilli flakes: Cayenne, Ring of Fire or any thin-walled red chilli produces exactly the flavour most people associate with chilli flakes. Thin skins dry quickly and evenly. 2-3 hours in the oven is typically sufficient.
For fruity, aromatic flakes: Aji Lemon (as we use in our original batch) produces beautiful golden flakes with a bright citrus character and moderate heat. Habanero and Scotch Bonnet produce intensely fruity flakes — use sparingly, a pinch goes a very long way.
For extreme heat flakes: superhot varieties like Naga, Trinidad Scorpion Moruga and Carolina Reaper produce flakes of extraordinary intensity. These are best blended with milder varieties rather than used straight — a 90/10 mix of cayenne to naga gives controlled heat with the superhot’s complexity.
For milder, sweeter flakes: Ancho (dried Poblano) or Mulato varieties produce dark, earthy flakes with low heat and complex chocolate-coffee notes. Excellent blended into spice rubs.
Thick-walled varieties including habanero, scotch bonnet and bell pepper take significantly longer to dry than thin-walled types. Plan for 4-6 hours in the oven or 6-8 hours in a dehydrator for these varieties. Partially drying them in a dehydrator first then finishing in the oven is a practical approach.
Homemade Chilli Flakes
Equipment
Method
- Wash and thoroughly dry your chilli pods with a clean towel
- De-stalk and slice the pods in half lengthways. Leave seeds in for hotter flakes or remove for milder
- Place cut-side up on a baking tray — don't overlap
- Heat oven to 80°C (175°F) and place the tray inside, leaving the door very slightly ajar to allow moisture to escape
- Check pods every hour. They are ready when completely brittle and crumble easily between gloved fingers — typically 2-5 hours depending on variety and thickness
- Remove from oven and allow to cool completely on the tray
- Once cooled, grind to your preferred texture using a spice grinder, pestle and mortar, or by hand in a ziplock bag with a rolling pin
Notes
- Wash, dry, de-stalk and halve the chilli pods as above
- Arrange in a single layer on dehydrator trays — don’t overlap
- Set dehydrator to 55-60°C
- Dry for 4-8 hours depending on variety and thickness — check every 2 hours
- Pods are ready when completely brittle and snap cleanly rather than bending
- Cool completely before grinding
- Always wear nitrile gloves when handling hot varieties — capsaicin penetrates skin and causes prolonged burning
- Open windows during the oven drying phase — chillies release intense aromatic fumes
- Thick-walled varieties (habanero, scotch bonnet) take longer to dry than thin-walled types (cayenne, bird’s eye)
- Store finished flakes in an airtight jar away from light — they keep for 6-12 months
- Mix different varieties before grinding for complex flavour blends
FAQ
What temperature should I dry chillies in the oven?
80°C (175°F) with the door slightly ajar. This is low enough to dry the chillies without cooking them, preserving colour and flavour. Higher temperatures cook rather than dry, reducing flavour quality. Leave the door slightly open to allow moisture to escape.
How long does it take to dry chillies in the oven?
Between 2 and 5 hours depending on variety and pod thickness. Thin-walled varieties like cayenne and bird’s eye typically take 2-3 hours. Thick-walled varieties like habanero and scotch bonnet can take 4-5 hours. Check every hour and remove when pods are completely brittle.
Can I use a microwave to dry chillies for flakes?
Not recommended. Microwaves heat unevenly and at too high a temperature — you’ll end up cooking and partially burning the chillies rather than drying them slowly. The resulting flakes will be darker, more bitter and have reduced flavour. Use an oven or dehydrator for best results.
How do I know when chillies are dry enough?
he definitive test is whether the pod crumbles immediately when crushed between gloved fingers. If it bends or feels leathery at all, it needs more drying time. Any residual moisture will cause mould to develop in storage.
Do I need to remove seeds before making chilli flakes?
No. Leaving seeds in is the easiest approach and produces hotter flakes since seeds are coated in capsaicin from the surrounding membrane. Remove seeds if you want milder flakes or a finer texture without seed fragments.
How long do homemade chilli flakes last?
Stored in an airtight jar away from direct light, homemade chilli flakes keep well for 6-12 months. After this they remain safe to use but gradually lose potency and colour. Label your jars with the date and variety.
Can I mix different chilli varieties together?
Absolutely — mixing varieties before grinding produces complex, multi-layered flavour profiles. Classic combinations include cayenne with a small percentage of superhot for heat, or a mix of red and yellow varieties for visual appeal and flavour complexity.
More Ways to Preserve Your Chilli Harvest
Chilli Oil Recipe — infuse dried chillies in oil for a versatile condiment that keeps for months.
Chilli Chutney Recipe — one of the best ways to use a glut of fresh chillies. Stores for up to a year.
Chilli Jelly Recipe — sweet, spicy and perfect with cheese. Makes an excellent homemade gift.
Pickled Jalapeño Recipe — quick to make and keeps for months in the fridge.
How to Preserve Chillies — our complete guide to every preservation method including freezing, pickling, drying and fermenting.
I use a rolling pin to crush the dried chillies. Just put them in plastic sandwich bag or similar.
I don’t grow my own but buy a small bag when I need one chilli for a recipe. Often, the others in the bag get left in the fridge to wither over time, forgotten. Had a brainwave this morning about saving these chillis from certain death and found your post, thank you. I’m off to rescue my current batch from a visit to the food waste bin!
Jenny
Glad to have helped! Good luck making your chilli flakes!
Have wanted to know how to do this – I have a glut this year. Will be drying this weekend! Thanks.