
If you grow chilli peppers in the UK, grow lights are one of the most useful/impactful investments you can make. One of the main problems that chilli growers face in temperate climates like we have in the UK or Europe is the lack of light. Our growing season is short, our winters dark and cold. Many of the hot/super hot varieties such as habaneros, nagas etc needs a good 5-6 months from sowing to harvest. Without adding grow lights you are likely to encounter leggy seedlings, slow growth and unripe pods. In this guide we will tell you what the best grow lights for chilli plants are.
I tend to sow my chilli seeds in January then use grow lights post germination to produce strong compact seedlings through late winter and early spring. Then when the days lengthen in Spring I have strong semi mature plants ready to move to the greenhouse whenever the weather allows. The ideal early-season setup (which I have settled on) combines grow lights with a heated propagator — see our guide to the best heated propagators for chilli seeds for recommendations at every budget.
We have been using grow lights here at The Chilli King for over 20 years now and have experience with most types of lights you will come across. In this guide we will cover the main types of grow lights, recommend different lights for different budgets and tell you everything you need to know to use them effectively and maximise your harvest.
Do You Need Grow Lights for Chillies in the UK?
To be honest not everyone does. For my first few years of growing I didn’t use grow lights. I stuck to fast growing annum varieties such as Apache, Cayenne and Hungarian Hot Wax and raised them initially on a sunny south facing windowsill before moving them outside to a mini greenhouse.
It wasn’t until I got more immersed in the chilli growing hobby that I started dipping my toes into grow lights. This really started when I want to grow some slower growing/hotter varieties like Habaneros, Birds Eye and Nagas.
If any of the following apply then grow lights might make sense for you:
- Your seedling go leggy. Tall thin seedlings that flop over or lean towards the window are a sign of insufficient light. Leggy plants tend to not be so strong and have weaker root systems. Grow lights produce compact/bushy plants that have a better chance of going on to be productive high yield plants. See our guide to growing chilli peppers in the UK for more on why seedling quality matters so much.
- You want to grow super hot varieties. The best time to sow slow-maturing chinense varieties such as habanero, Scotch bonnet, naga, Carolina Reaper is December to January. At that time of year, UK daylight hours are too short and light intensity way too low for seedlings to thrive on a windowsill. Grow lights solve this completely.
- You want to grow indoors all year round. With the right lighting setup you can grow chilli plants from seed to harvest entirely indoors — useful if you don’t have a garden or greenhouse.
- You are overwintering your chilli plants. Chilli plants kept through the winter benefit enormously from supplemental light, particularly from November through February when natural daylight is at its lowest. See our overwintering guide for more on keeping plants through the winter months.
2 Types of Grow Light – Which is Right For you?
Grow light technology has changed enormously over the last 15 years. Recently LEDs have become the dominant technology combining low running costs and excellent performance. They are now the grow lights we recommend for most UK growers. Here is a full breakdown of the two main options.
LED Grow Lights – Best for Most UK Chilli Growers
Modern full-spectrum LED grow lights are the best option for most UK home growers and the technology we’d recommend to anyone starting out today. They’ve come a long way in the last few years — the clunky, hot, unreliable, blue/purple coloured LED lights of a decade ago have been replaced by slim, silent, super efficient panels that produce compact strong plants and excellent results.
Why LED is now the default recommendation:
Energy Efficiency – This was the biggest benefit I found when I started to use LED grow lights. A 100W equivalent LED might draw only 45-50W from the wall. Over a growing season running 14-16 hours a day this adds up to a meaningful saving on your electricity bill.
Full spectrum: Modern LED panels produce light across the full visible spectrum, from blue through white to red. This means a single LED light panel works effectively at all stages of growth – from germination, seedling development, vegetative growth and even fruiting. You don’t need separate blue and red lights for different growth stages.
Cool Running – LEDS lights produce very little heat compared to CFL or HID lights. This means they can be positioned closer to your plants without producing heat damage/stress. With most LED set ups you do not even need to worry about ventilation or using a fan to cool the grow area.
Lifespan – Good quality LEDs typically last for 50,000+ hours. This should mean that they outlast alternatives like CFL and HID lights.
Our LED Grow Light Recommendation by Budget
We have used lots of different LED grow lights over the years. Below are some of the specific models we recommend readers at each price point. All are widely available on Amazon.
Budget option — under £40
To be honest the very cheap end of the LED grow light market is best avoided. Lights at this level tend to fall into a couple of different types:
Wand/Goose Neck lights – I’ve tried a few of the wand type grow lights you’ll see online. Because they typically only consume about 10 Watts they simply cannot throw out enough light energy to make seedlings thrive.
Cheap LED Panels – While some of these can work well I have found reliability is the main issue. These cheaper lights tend to fail randomly and are not always as efficient as advertised.
My honest advice is to save up a bit more money and go for one of the options below.
Mid Range – up to £100
The Spider Farmer EVO SF1000 is the grow light I use most (and is always set up ready to grow in my home office!). It comes with high quality full spectrum Samsung LEDs with the grow area is spec’d at 70cm x 70cm – but in reality I think it is more suited to about 100cm x 80cm.
The SF1000 has a useful dimming knob so light intensity can be easily changed(increased) as your seedlings grow. It has an aluminium heat sink to dissipate heat so there is no noisy fan needed. It’s maximum consumption is 100watts making it incredibly energy efficient. Check current prices on Amazon.
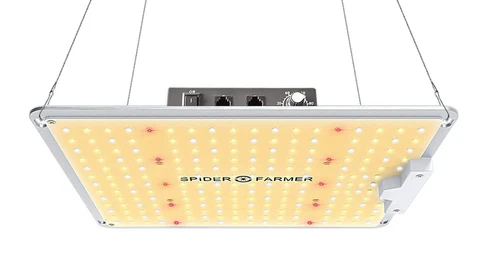
If you would prefer a panel that supports a wider, narrower grow area then the Spider Farmer SF600 might be better for you. It is not quite as powerful as the SF1000 (peak draw of 74W versus 100W) but the grow area is 2×4 ft. This slim form factor makes it ideal for covering a standard seed tray or propagation shelf. Check out prices on Amazon.
High End – over £100
The Spider Farmer SF2000 EVO is perfect if you want a bigger grow set up. Like it’s smaller brother the SF1000 it uses the same high quality Samsung LEDs but has a much larger grow area of 70cm x 140cm. Check prices on Amazon.
This is really for someone that wants to grow indoors all year round from seed to fruit or if you want to raise large numbers (>10) plants to near maturity indoors.
Fluorescent Lights
Until about 10-15 years ago fluorescent grow lights were the go to option for chilli growers – including us. Here we will cover two main types of fluorescent lights:
1. Compact Fluorescent Lights (CFLs)
We ran a 125W CFL in our grow setup for several seasons and got excellent results. They’ve been largely superseded by LED for new setups but if you already have CFL equipment it’s absolutely worth continuing to use it.
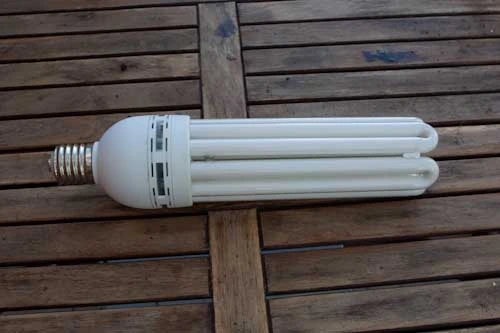
Typical CFL grow light sizes available are 125W, 200W or 300W. They typically only come in one colour spectrum – blue for seedlings and vegetative growth or red for flowering and fruiting. Some ‘purple bulbs aim to offer the best of both worlds. For a starter grower a 125W CFL is usually sufficient for starting chilli seedlings. In fact it is the one I used for many years. Take a look at prices on Amazon.
CFL bulbs do tend to produce quite a bit more heat than LEDs so if you are growing in a confined area you will definitley need a fan to help with ventilation.
1. Fluorescent Tube Lights
Standard fluorescent tube lights — the long, thin strip lights you might have in a kitchen or workshop — are the cheapest possible grow light option and genuinely effective for the earliest stage of seedling growth. We used a home-built fluorescent tube setup for years and it was what got us started with indoor growing.
The setup is simple: mount two or three cool white fluorescent tubes on a piece of MDF board, position it about 10cm above your seed trays, and run it for 16-18 hours a day. The light intensity is low compared to CFL or LED, but for young seedlings in the first 4-6 weeks it’s often sufficient — and the cost is minimal.
The important limitation: standard fluorescent tubes only produce the spectrum of light useful for early seedling growth. They won’t take your plants through to flowering or fruiting. If you want to grow past the early seedling stage under artificial light, you’ll need to step up to LED or CFL.
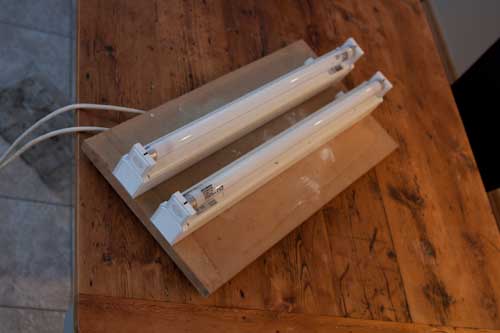
The benefits of standard tube lights are that they are very cheap, readily available and like LEDS produce very little heat. If opting for this type of lighting always try to get the “cool white” variety of bulbs as they produce the best spectrum of light.
The downside about this normal fluorescent lighting is that the spectrum of light the tubes produce is only really suitable for seedlings. As a result this type of lighting is unsuitable if you want to raise your chilli plants through to the fruiting stage under lights. If that is the case you should consider one of the options below.
We built our original grow box around fluorescent tubes — see our detailed grow box build guide and grow cupboard build for how we set these up. It’s a satisfying project and the results are genuinely good for starting seeds on a tight budget.
Our Personal Grow Light Setup
Over the years we have used everything from a home-built fluorescent tube box to a 125W CFL in the cellar to more modern LED setups. The evolution of our setup reflects the evolution of the technology – each generation of lights has been noticeably better than the last.
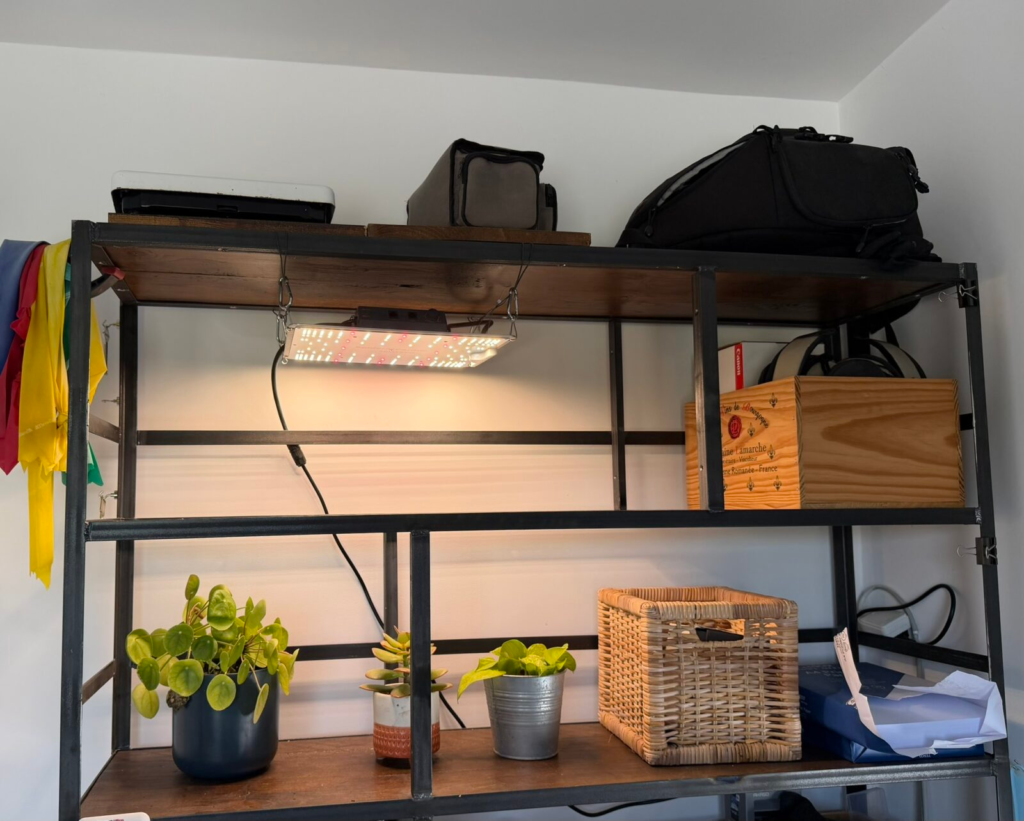
Our current main setup is a Spider Farmer SF1000 LED panel. I have this positioned inside a large bookcase in my home office all year round. As well as being amazing for my chilli seedlings growth it also provides some nice bright light in my home office during those dull Jan/Feb days!
Pro Tip: I use one of these cheap smart plugs to put my grow lights on timer schedules. This allows me to easily adjust when the lights come on/off via my smart phone. It also has the added benefit of letting you see the power consumption of the lights over time.
How to Use Grow Lights Effectively for Chilli Plants
Getting the lights is the first step — here’s how to use them well
How Many Hours Per Day?
Run your grow lights for 14-16 hours per day for seedlings and young plants. This mimics a long summer day and gives chilli plants the light they need to grow strongly without the stress of continuous light.
The easiest way to manage this is a simple plug-in timer — set it to come on before you wake up and go off in the evening. Timers cost a few pounds from any DIY store and are essential if you’re running lights in a room you don’t use constantly. Chilli plants should have a minimum of 6-8 hours of darkness per day — don’t run lights 24 hours, it’s not beneficial and wastes electricity.
How Far From the Plants?
This depends on the light type:
- LED panels — follow the manufacturer’s guidance but typically 30-60cm above seedlings/planrts is the best range. As a general rule move them further away as plants grow taller. LED panels run cool enough that you can get them fairly close without scorching. If your lights have a dimmer like the Spider Farmer SF1000 then always start off on <50% power and gradually increase it 10-15% a day keeping an eye out for scorch marks.
- CFL — keep at least 15-20cm from the top of seedlings and monitor leaf temperature by holding your hand at plant level — if it feels warm after 30 seconds the light is too close. Be sure to use a fan to keep temperatures down.
As your plants grow, adjust the light height to maintain the correct distance. Many grow light setups come with adjustable hanging straps for exactly this reason.
When to Start and Stop
Start running grow lights as soon as your seeds germinate and the first seedlings appear, they need light immediately once they have emerged from the compost. There’s no benefit to lights before germination as seeds don’t need light to germinate, only heat. For germination specifically, a heated propagator provides the warmth needed without requiring lights at that stage.
Continue running lights until your plants are ready to move outside or into a greenhouse with good natural light, typically late April to May for most UK growers. When making the transition, harden the plants off gradually rather than moving them straight from artificial light to direct outdoor sun, which can cause leaf bleaching. See our hardening off guide for how to do this correctly.
For me I start to use my grow lights in January as soon as germination occurs. Then I aim to have all of my plants out in the greenhouse by mid May at the latest.
Adding a Fan
When using CFL lights, a small fan circulating air around your seedlings is worth adding. It serves two purposes — keeping plants cool under warm lights, and strengthening stems by creating gentle movement, which produces stronger, more resilient plants better prepared for outdoor conditions. LED panels rarely need a fan for temperature management (unless you are growing in a cupboard or tent) but the stem-strengthening benefit applies regardless of light type.
Dealing with Leggy Seedlings
If your seedlings are still going leggy despite being under grow lights, either the light is too far away, the hours are insufficient, or the light intensity is too low for the coverage area you’re trying to light. Move the light closer (checking for heat), extend the daily hours toward 16, or consider whether your panel is powerful enough for the number of plants you’re trying to light. See our guide to repotting chilli seedlings for advice on dealing with leggy plants when potting on.
FAQ
Will grow lights increase my electricity bill significantly?
A 45W LED panel running 15 hours a day costs roughly 10-15p per day at current UK electricity rates — around £18-27 over a 3-month growing season. This is very manageable and the improvement in plant quality and earlier fruiting more than justifies it for most growers.
What type of grow light is best for chilli seedlings?
A full-spectrum LED panel is our first recommendation for anyone buying new. It covers all growth stages, runs cool, is energy efficient and long-lasting. We use a Spider Farmer SF1000.
Are cheap LED grow lights any good?
Quality varies considerably. Budget LED panels from unknown brands can underperform their claimed wattage and coverage significantly. Established brands like VIPARSPECTRA and Spider Farmer have a track record of consistent quality at reasonable prices. Based on our testing over the years, spending under £40 on a grow light is likely to result in disappointment.
My seedlings are leggy despite using grow lights — what’s wrong?
The three most common causes are: light positioned too far from the plants, insufficient daily hours, or a panel that isn’t powerful enough for the area you’re trying to cover. Try moving the light closer (monitoring for heat), extending to 16 hours per day, and checking whether your panel’s actual coverage area matches what you’re trying to light.
Will grow lights increase my electricity bill significantly?
My SF1000 grow light uses 100 Watts at its maximum setting. At the time of writing the average UK domestic electricity price is 26.11 pence per kWh. This means to run the light for 10 hours a day would cost £0.26p per day or £7.80 per month. That said I run my lights overnight on the cheap rate mostly which brings the cost down to around £4/month.