One problem i face every year is what to do with my chilli plants when I go away for a few days during the summer. It can be soul destroying to put so much effort into nurturing your chilli plants right through the winter and spring only to have them fry during a hot summers day when you are away for the weekend.
I’ve read a few times abut self watering planters and seen a few different designs floating around on the internet. I finally decided to see if i could make some in preparation for the [hopefully] hot summer ahead and prevent any last minute panics about how my plants will survive when I’m away later in the year.
Self watering containers will not only be useful while I’m on holiday but will hopefully reduce my watering routine each day. I grow most of my pepper plants in pots which means they tend to need more watering than if they were in the ground. In the summer this means watering both in the morning and the evening to avoid the plants running dry. If I can get a system that works i should have not only healthier plants but will also save myself some time ferrying the watering can around the garden every day.
I intend to build a couple of self watering containers ready for next year. I’ll post a series of articles to share my final design and experiences throughout next summer. Below are my current thoughts of what I’ll build.
Self Watering Planter Basic Design
Below is a rough sketch of what I am trying to achieve. The idea is that the bottom of the containers contains a reservoir of water that can be topped up from the pipe on the side. As the plant uses up the moisture in the main compartment, more moisture is sucked up through the medium in the wicking pot which is in the middle of the water reservoir.
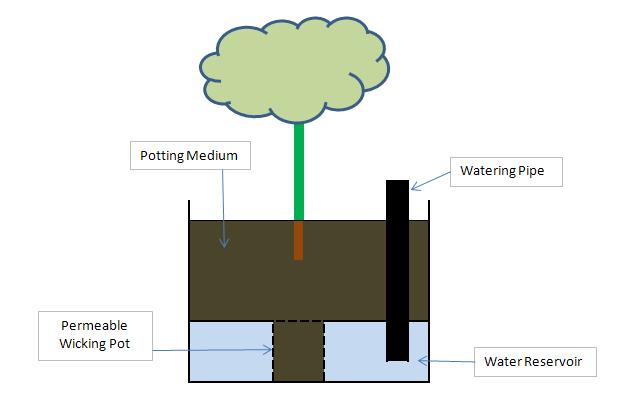
The Components:
Main Container
The options for the main container are almost limitless. Here I intend to use a regular plastic storage box that you can pick up from most high street stores.
Tip: If possible i’ll use a dark colored container as light colored or translucent plastics are much more susceptible to degradation via sunlight which may significantly shorten the life of the container.
Wicking Pot
This is the real secret to a self watering container. Here i will use a small pot drilled with holes to allow the moisture through. An alternative might be an aquatic pot which are readily used for planting pond plants or when growing with hydroponics. It’ll depend on what size i need.
Moisture will be soaked up from the reservoir around it and in turn can be drawn upwards from the plants roots above.
Filling Tube
This allows me to fill the water reservoir below without having to water through the roots of the plant.
Water proof membrane
This layer prevents the plants roots or the compost from getting too wet. The layer should be water poof (and root proof) apart from the center which is open above the wicking pot. I’ll probably use regular capillary matting that you can pick up in most decent garden centers.
Wish Me Luck
So, hopefully i’ll find some time in the next couple of weeks to get these bits and pieces together and build a couple of these pots over the winter. I’ll keep you posted on progress and i’d be interested to hear if anyone else has built one of these via the comments box below.