≡ Menu

A question we are getting asked all of the time at this time of year is how to speed up the ripening process that occurs naturally in your chillies.

In nature the two things that help your chilli peppers ripen are a constant warm temperature and long sunny days (lot of light). As summer fades away and the cooler short autumn days approach it becomes much harder for your pepper plants to ripen the fruit they are bearing. The cooler temperatures and lack of heat caused by autumns shorter days simply means that your chilli plants do not have the energy to ripen their fruit.

Move your chilli plants indoors

Perhaps the easiest way to solve one of these problems (cooler temperatures) is to move your plants indoors. Ideally a south facing conservatory or windowsill is best as this will hopefully allow the plant to enjoy a constant warm temperature while still maximizing the amount of sunlight it receives.

If possible avoid putting your chillies in the fridge. Doing so will of course keep them fresher for longer however it will not help them ripen and some say the cooler temperatures of a fridge can breakdown the naturally occurring sugars, impacting both the taste and heat of the peppers.

Ripen Your Chillies Off the Plant

As with virtually all fruit and vegetables you can simply pick your chillies while still unripe and allow them to ripen naturally by storing them in a dry place in the kitchen. This works really well particularly when the chillies are already partially ripe. If you decide to adopt this approach and have quite a few chillies then perhaps one of the best (and most decorative) ways to ripen them indoors is to make a chillie ristra.

The Old Wives Approach To Ripening Chillies

One technique we heard about recently which sounds interesting is to place your harvested chillies in a brown paper bag with a couple of ripe apples. Apparently this helps speed up the ripening process. This sounds a bit like the theory that banana skins helping to ripen fruit. We’ve been unable to find out if this works or what the science is behind it but it may be worth a go!

Be sure to let us know which chillie ripening method has worked best for you by leaving a comment below.

[ad name=”square”]
9 comments

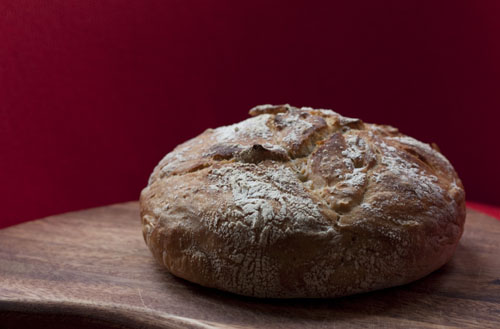
Ok, so first up apologies this recipe has no chillies in (yet!). I’ve been trying to find the time to experiment making chillie bread from this recipe but have simply been too busy over the last couple of weeks. I’ve been itching to post this bread recipe as it is incredibly easy, there is no kneading involved and the results are truly on a par with bread you might buy from an Italian deli.

best bread recipe

If you have ever tried to make bread at home before you’ll have either soon got bored of the hassle of doing it all by hand or have been disappointed with the results that domestic bread making machines produce. This recipe will change the way you make bread forever, it really is that good!

Bread Recipe Ingredients

Water: 1 1/3 cups of warm water
Strong Bread Flour: 400 grams (plain four works too)
Salt: 1 1 /4 teaspoons
Yeast:1/4 teaspoon of fast action dried yeast (the stuff in sachets)

How to Make No Knead Bread

Measure out the dry ingredients and mix together briefly in a bowl. Add the water and mix for about 1 minute until the ingredients come together to form a wet dough. To avoid making any mess i use a plastic spatula rather than my hands. Be sure to measure the ingredients exactly as it is easy to end up with quite different bread if the quantities change slightly. Now simply cover the bowl with cling film and place somewhere warm to allow the dough to rise.

After 12 hours it is time to take the dough out of the bowl. With the spatula simply fold the dough over on itself in each corner then gently tip it out of the bowl onto a dusted tea towel. The creases of the folds should now be on the bottom of the dough ball. Dust the top of the ball with flour, cover with the rest of the cotton towel and leave for a further 2 hours.

Update: I no longer tip it out onto a tea towel as the dough is quite moist and makes a mess. Instead I turn it over and leave it in the large mixing bowl (about 50cm diameter).

After 1 and a half hours put your dutch oven or casserole pot (I use a le creuset cast iron pot) in your oven and preheat 250 Celsius (as hot as your oven will go).

After a further 30 mins (once the 2 hours is up) remove the casserole dish from the oven, dust the inside with flour and place the dough in (folded side up) inside. Be careful as your casserole dish will be smoking hot! Put the lid on and bake in the oven for 15 minutes. After the 15 minutes is up go back and remove the lid and bake for a further 25 minutes.

Finally remove the bread from the pot and allow to cool on a rack for 15 minutes. Then all that is left to do is marvel at the results.

What makes this bread recipe so good?

There are two keys to this bread recipe as far as I can see:

1) The long proofing time (12 hours) allows the yeast to do its thing and form good gluten, giving you a bread with a nice crumb structure and good chewy center.

2) Cooking the bread in the sealed casserole dish increases both the heat and humidity during the baking process. The increase humidity helps for the wonderful crust that you’ll get on the final loaf.

Update: I’ve found that be using either slightly more flour or slightly less water (maybe 415 grams of flour – not much extra!) the resulting dough is a bit drier and easier to handle when taking it out of the bowl for the final 2 hours of proofing. You may need to experiment a little depending on your oven and type of flower used.

Update II: After some more experimentation I found while the above recipe/method produces great bread with a wonderful crust it does sometimes taste a bit ‘crumpety’. If I want more of a ‘bready’ interior and regular loaf shape (both better for making sandwiches) I follow the same recipe but bake it on a baking tray. When taking the dough out and folding prior to the final 2 hour proofing I simply allow it to rest on a well floured baking tray, gently pushing/stretching it out into a ciabatta shaped loaf. I then allow to rise for the standard two hours then bake at about 220 celcius for 40 minutes.

Update III: I now always make two batches at a time whenever I make the bread. I cook one in the casserole pot and one ciabatta shaped just on a baking tray. It takes very little extra effort, you just need another large mixing bowl and you get an extra loaf for the freezer.

[ad name=”square”]

23 comments

A couple of years ago my sister gave us a chilli grinder. I’m not sure where she got it but it was essentially a clear pepper mill that was filled with dried chilli flakes and a small amount of salt. It lives on the dining table alongside the salt and pepper as we tend to spice most of our food up.

Every time we have people over for dinner they always spot the chili grinder say how cool it is then ask where they can get one. The simple answer is to make your own. All you need is a clear pepper mill, some dried chili flakes and sea salt.

Simply take an empty salt/pepper mill and fill it with chilli flakes and you have your very own chilli mill.

You can buy the chilli flakes ready made however this can be an expensive option as they are usually sold in small quantities. It usually works out much more efficient to make your own chilli flakes from either home grown chillies or shop bought dried chillies. If you you want to make your own flakes from home grown chillies you can find out how on our preserving chillies page. Alternatively you can buy dried chillies very cheaply and turn them to flakes yourself.

Making your own chilli flakes is extremely easy. You could use a pestle and mortar to bash up your dried chillies. Be warned this can release chilli fumes that will result in you burning your eyes. A much easier way is to get hold of a bladed coffee grinder and use this to pulse your dried peppers into flakes. You should either buy a dedicated grinder to use for chillies or use an old one that will no longer be used to make coffee for obvious reasons.



 

0 comments