We’ve talked before on the site about the different ways to make compost and covered the basics of how to compost properly.
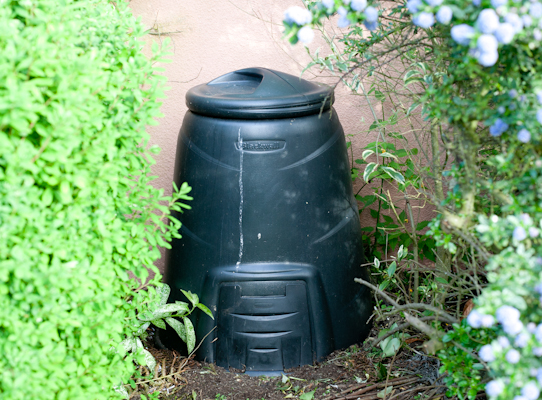
Over the last few months we’ve received a few emails from readers asking how to make great compost with a dalek composter. Well after a few failures, over the last couple of years I’ve been perfecting the art of making compost with plastic dalek compost bins. Below I’ll share the key things I did that enabled me to make perfect compost with a dalek.
Shred Material Before Adding
Size does matter. If you want to give your compost a big headstart then you’ll need to ensure the material you add to your bin is as small as possible. While fruit peelings, soft prunings and other ‘wet’ ingredients tend to break down very quickly meaning size is less important. However larger woody ingrediants like twigs can take many years to decompose. The smaller you can get your ingredients at the start the quicker your compost will take to make.
A couple of years ago I was given an electric garden shredder (like this) and it has transformed the speed with which my dalek churns out great compost. I now put all prunings/cuttings through the shredder before adding it to the compost bins. It only take a few minutes to do but as well as being incredibly satisfying it also shaves months off the composting time.
If you dont have a shredder then try to reduce the size of woody material by snipping it with secateurs or garden shears before adding it to the composter.
Similarly any paper or card I add goes through the old paper shredder in our office first. Any vegetable scraps/peelings are chopped into small pieces before they’re added to the compost caddy in the kitchen.
To Much Green
One of the most common problems people have with their compost heaps is the addition of too much ‘green’ material. If your heap is made primarily of green plant cuttings, grass clippings and vegetable scraps then you’ll almost certainly struggle to make good compost.
The simple solution is to add more ‘brown’ material which is rich in carbon and is essential to speeding up the decomposition process. ‘Browns’ might take the form of shredded woody prunings, cardboard, dried leaves or shredded paper.
The ratio of brown to green doesn’t need to be complicated, as a rough guide I aim for a 50:50 ratio but usually end up with slightly more green. Of course browns tend to be dry so weigh much less than the wet greens. Don’t worry about it all too much.
In order to help get the balance right, whenever I take out the vegetable peelings/scraps from the kitchen I grab a few handfuls of shredded paper from our office. Likewise if I add some grass clippings from the lawn. I’ll be sure to throw in some brown leaves form the mulch pile to keep the balance.
Lack of Moisture
Another common problem with dalek composters is not enough moisture. The organisms that break down your waste need moisture in order to thrive. While the snugly fitting plastic lids do a great job at keeping the heat in your heap, they tend to not let any rain water into the pile. This can lead to a lack of moisture.
The way I diagnosed the problem was the discovery of a colony of ants living in the middle of one of our daleks. Ants avoid moisture and will only take up residence in a sheltered dry environment. If you reach into the middle of the heap, the compost should be ever so slightly damp to touch. It should not be sopping wet and heavy, but not dry and crumbly.
As a general rule if you think your heap is too dry add a watering can of water. Going forward, whenever you add more material (especially dry matter like shredded paper, dry leaves etc) give the heap a good soak with a watering can. When you take a handful of material from the middle of the heap and squeeze it it should feel moist/wet but no drips of water should come out of it.
When you do get the moisture levels right in a dalek composter, the fact that they are plastic and have airtight lids means they do a great job of keeping the moisture level constant going forward.
More Oxygen Required
When using a dalek, getting enough oxygen to the compost can be a challenge. Where a traditional compost pile isn’t airtight and can simply be forked over, a darlek typically requires emptying and reloading…or so I thought.
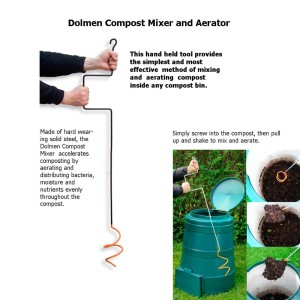
After some research I discovered compost turners. They are like a giant corkscrew that you simply turn into the center of the pile and lift up which stirs the pile and introduces lots of air to the center of the pile. I try to give each dalek a turn once a week to ensure both an even mix of material as well as a good supply of oxygen throughout.
Conclusion
So there you have it. Using the above tips my darleks typically turn out quality compost in less than 6 months, often much less. While some gardeners dismiss the effectiveness of daleks for composting, from my experience that’s usually the conclusion when you’re not doing it right.
If you make a few changes like those outlined above there’s no reason your daleks shouldn’t be producing great quality compost. If space is limited their small footprint and portability gives them many advantages of a traditional open compost heap. There’s no reason why you can’t use great homemade compost when putting together your potting medium.