Growing chillies is sometimes associated with growing in the relatively warm climes of South America and Asia however growing peppers can be done successfully in the northern hemisphere. In order to get a decent harvest the plants will need to be started off either indoors or grow under glass.
When to Start Growing Chilies?
Exactly when you plant your chilli seeds will depend on your available growing space and conditions. Below i’ll talk about what I do here in the UK.
If you have the space it is best to plant your seeds early in the year (Jan/Feb) and nurture the seedlings indoors or under glass. This will give you a good head start on the growing season. Your plants can then be put outside (or even better in a greenhouse) once the threat of frosts pass. This will enable you to maximise your harvests later in the year.
Germinating Chilli Seeds
Chillies can be germinated much as any other seed. In order to give the seeds a bit of a helping hand to germinate you can place the seed in between two sheets of damp kitchen roll and put into a either a sealed freezer bag or plastic container. Place the bag somewhere warm such as in an airing cupboard or on top of a refrigerator. This method will help keep the heat and the moisture around the seeds, speeding up the germination process.
After 2-5 days days you will probably notice some of the seeds will have swelled up and may be even be starting to sprout. Now is the time to plant the seeds. Ideally you need a heated propagator however if you can keep the seeds in your house where the temperature is warmer and more constant temperature then a regular seed tray should do. My preference is to use small seed modules as they make it very easy to transplant and pot the seedling on later.
Of course you can take the easier approach and simply plant your chilli pepper seeds straight into the compost. Remember that different varieties take different times to germinate. If you are growing habanero peppers for example you can expect them to take up to 3 or 4 weeks to germinate, where as annum varieties such as cayenne will sprout much quicker.
When planting chilli seeds aim to space them about 5cms apart in normal multi purpose compost, ideally mixed with some vermiculite. Then lightly cover the seeds with about 0.5cm of compost and water them with a fine rose or spray. Check them every day and spray with a little water if they look a bit dry. The aim is to prevent the compost from drying out rather than keeping it wet.
The two main requirements that the seed has at this stage are heat and moisture. The optimum temperature for germination varies from species to species but roughly speaking can be said to be in the region of 23-30 degrees Celsius (about 73-86 Fahrenheit). To learn more about the optimum temperatures and how to achieve them check out this article.
To improve the germination rate of your chilli seeds try and keep the temperature of the seeds constant. The best way to do this is to use a heated propagator. If you don’t one anywhere in the home with constant low level heat source will do, for example on top of the refrigerator. Here is my favourite way of speeding up germination.
The time taken for germination varies greatly between varieties. More common varieties such as Apache or jalapeno usually germinate in anything between 1-3 weeks. Other more fickle varieties such as Habenero may take up to 6 weeks or longer. The key is to be patient!
Related: Our detailed guide to germinating chilli seeds.
Post Germination
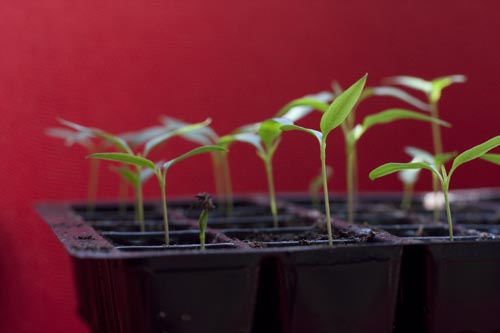
Once your seedlings have poked their heads out of the compost they suddenly have a new requirement for you to fulfill, light. This can be where growing in a northern climate such as the UK can present more of a challenge.
If growng in your house place your seedlings on a south facing windowsill or conservatory. If temeperature allow a greenhouse is one step better however ensure that nighttime temperatures are >10 degrees celcius.
The most common probem wth growing chillies indors is lack of light. If you chilli seedlings look tall and thin and lean towards the light then they are what we call ‘leggy’. In order to fix this you will need to give the lants more light.
Growing Chillies Under Grow Lights
One way often employed by growers to avoid leggy plants is by introducing artificial lighting, otherwise known as grow lights. There are many complicated (and often expensive) options with many different terms such as HID, Envirolights, EPS, Grow Lights etc etc. For now I will only discuss the use of the simplest and by far the cheapest option, simple fluorescent tube lights bought from any DIY store.
I have had much success in the past using a simple lighting set up that cost under £20 in total. All you need is to head to your local DIY store and pick up a couple (depending on the number of seeds) of fluorescent strip light fixings. Here’s some more detail on this simple grow light set up.
The one downside with fluorescent lighting is that they tend to give off lots of heat which can scold or even kill the seedlings. This problem can be eradicated by using bulbs that are called cool white. From experience most light fixings will come with normal bulbs so be sure to spend an extra couple of pounds on cool white bulbs.
Next all you need to do is to rig the lights up above your chilli seedlings. One thing to bear in mind is that ideally whatever you mount your lights to should be adjustable as you will need to move them higher as you little seedlings grow into big strong chilli plants!
I position the lights between 5-25cm from the top of your plants. I tend to use a simple timer switch so that the plants receive 18 hours per day under the lights. Alternatively you can put them by a window during the day then move them under the lights during the night.
Potting On Your Chili Plants/ Out
Once the seedlings have developed their second set of leaves it is time to re-pot them. I usually opt for pots about 10cm in diameter. Be very careful not to damage the seedlings during the potting on process. One good tip is to avoid toughing them altogether by re-potting the area of compost around the seedlings roots. By doing this hopefully you will avoid damaging the roots of the plant.
What type of pot you use is pretty unimportant. You can save money and use old yogurt pots or recycled plastic drinking cups while the plants are still small. Of more importance at this stage is to decide what potting medium to use.
Again depending on the time of year, your location and amount of light available you can keep the plants on you windowsill, in the greenhouse or under artificial lighting. Pepper plants love light, so the more they get the faster and stronger they will grow. If space is an issue inside then I can highly recommend one of the many mini greenhouses available. You can pick these up for only a few pounds and while they may not last forever they will certainly protect you chilli plants in early spring.
Depending on the variety you will most likely need to re-pot the chillies on again in a few weeks time. It is a good idea to avoid potting on your plants too early. Doing so can focus the plant’s growth on growing the roots rather than stems, leaves and flowers. A general rule of thumb is to only increase pot size when roots are appearing through the drainage holes at the bottom of the pot.
Once the risk of frost passes you can put the plants outside. Initially you might want to harden them off by placing outside for just a few hours a day. This will get the plants used to the direct sunlight and winds gradually.
During these early stages of growth your plants can be particularly susceptible to pests like aphids. Take a look at our pests and diseases article for ways to keep your young plants healthy.
What to feed chilli plants
One of the most asked questions is how often to feed pepper plants and what with? In the early growth stages I just water them as required. Ideally this is with harvested rainwater if not tap water is fine. How often to water depends on the heat. Typically in Spring this is once a day increasing to possibly twice a day in summer.
Once the flowers start to flower I introduce a few drops of liquid tomato food into their water during every other watering. I use half the dilution strength recommended for tomato plants. Doing so gives the plants the extra energy required to keep producing fruit over the summer months.
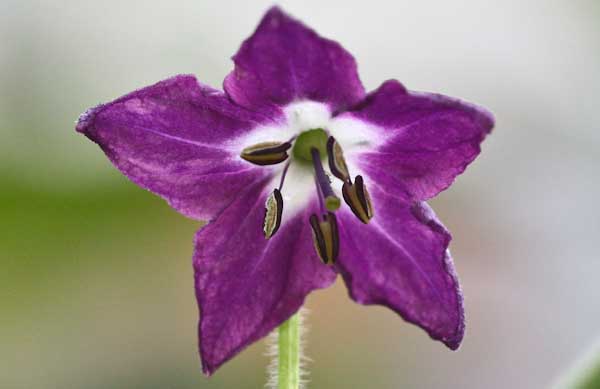
Chilli Plant Flowers and Fruit
As your pepper plants begin to mature you will start to notice flowers appearing on your plants. This is the sign you have been waiting for as it means that your first chillies are not that far off. All that stands between you and fresh chilli pods is pollination.
Be aware that different varieties of pepper flower and fruit at over various different time periods. Varieties such as Cayene and Jalapeno grow earlier and quicker than varieties such as habanero, scotch bonnet or naga. Slower varieties require more heat and light and are best kept in a conservatory or greenhouse to ensure the optimum harvest.
Pollination will be taken care of naturally by bees and other insects if you plants are grown outside. If you are growing inside your plants may suffer from flower drop. If this is the case you might want to consider hand pollinating your plants. Don’t worry, this is not as sordid as it may sound. To do so lightly rub your little finger inside the flower heads on your plants. Alternatively use a small artists paint brush or a cotton bud. This will do the bees job of moving pollen around from flower to flower.
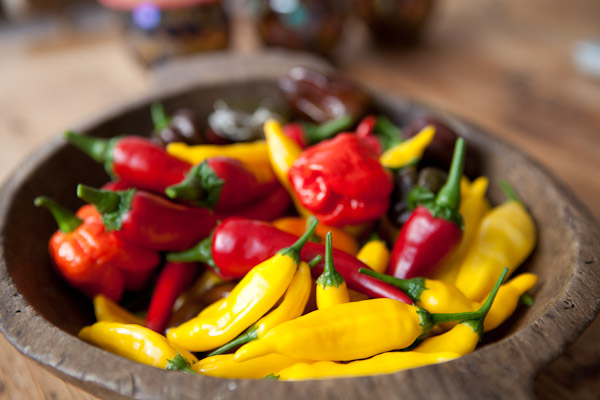
Eventually you will see that some of the flowers will go brown and drop off. This is usually no need for alarm as the cause will be a chilli pushing its way through the flower. All you need to do now is to keep up the water/food and wait for your chillies to ripen.